My Google Sheets Budget Template (for Millennials)
Here's the spreadsheet budget I made to make budgeting fun.
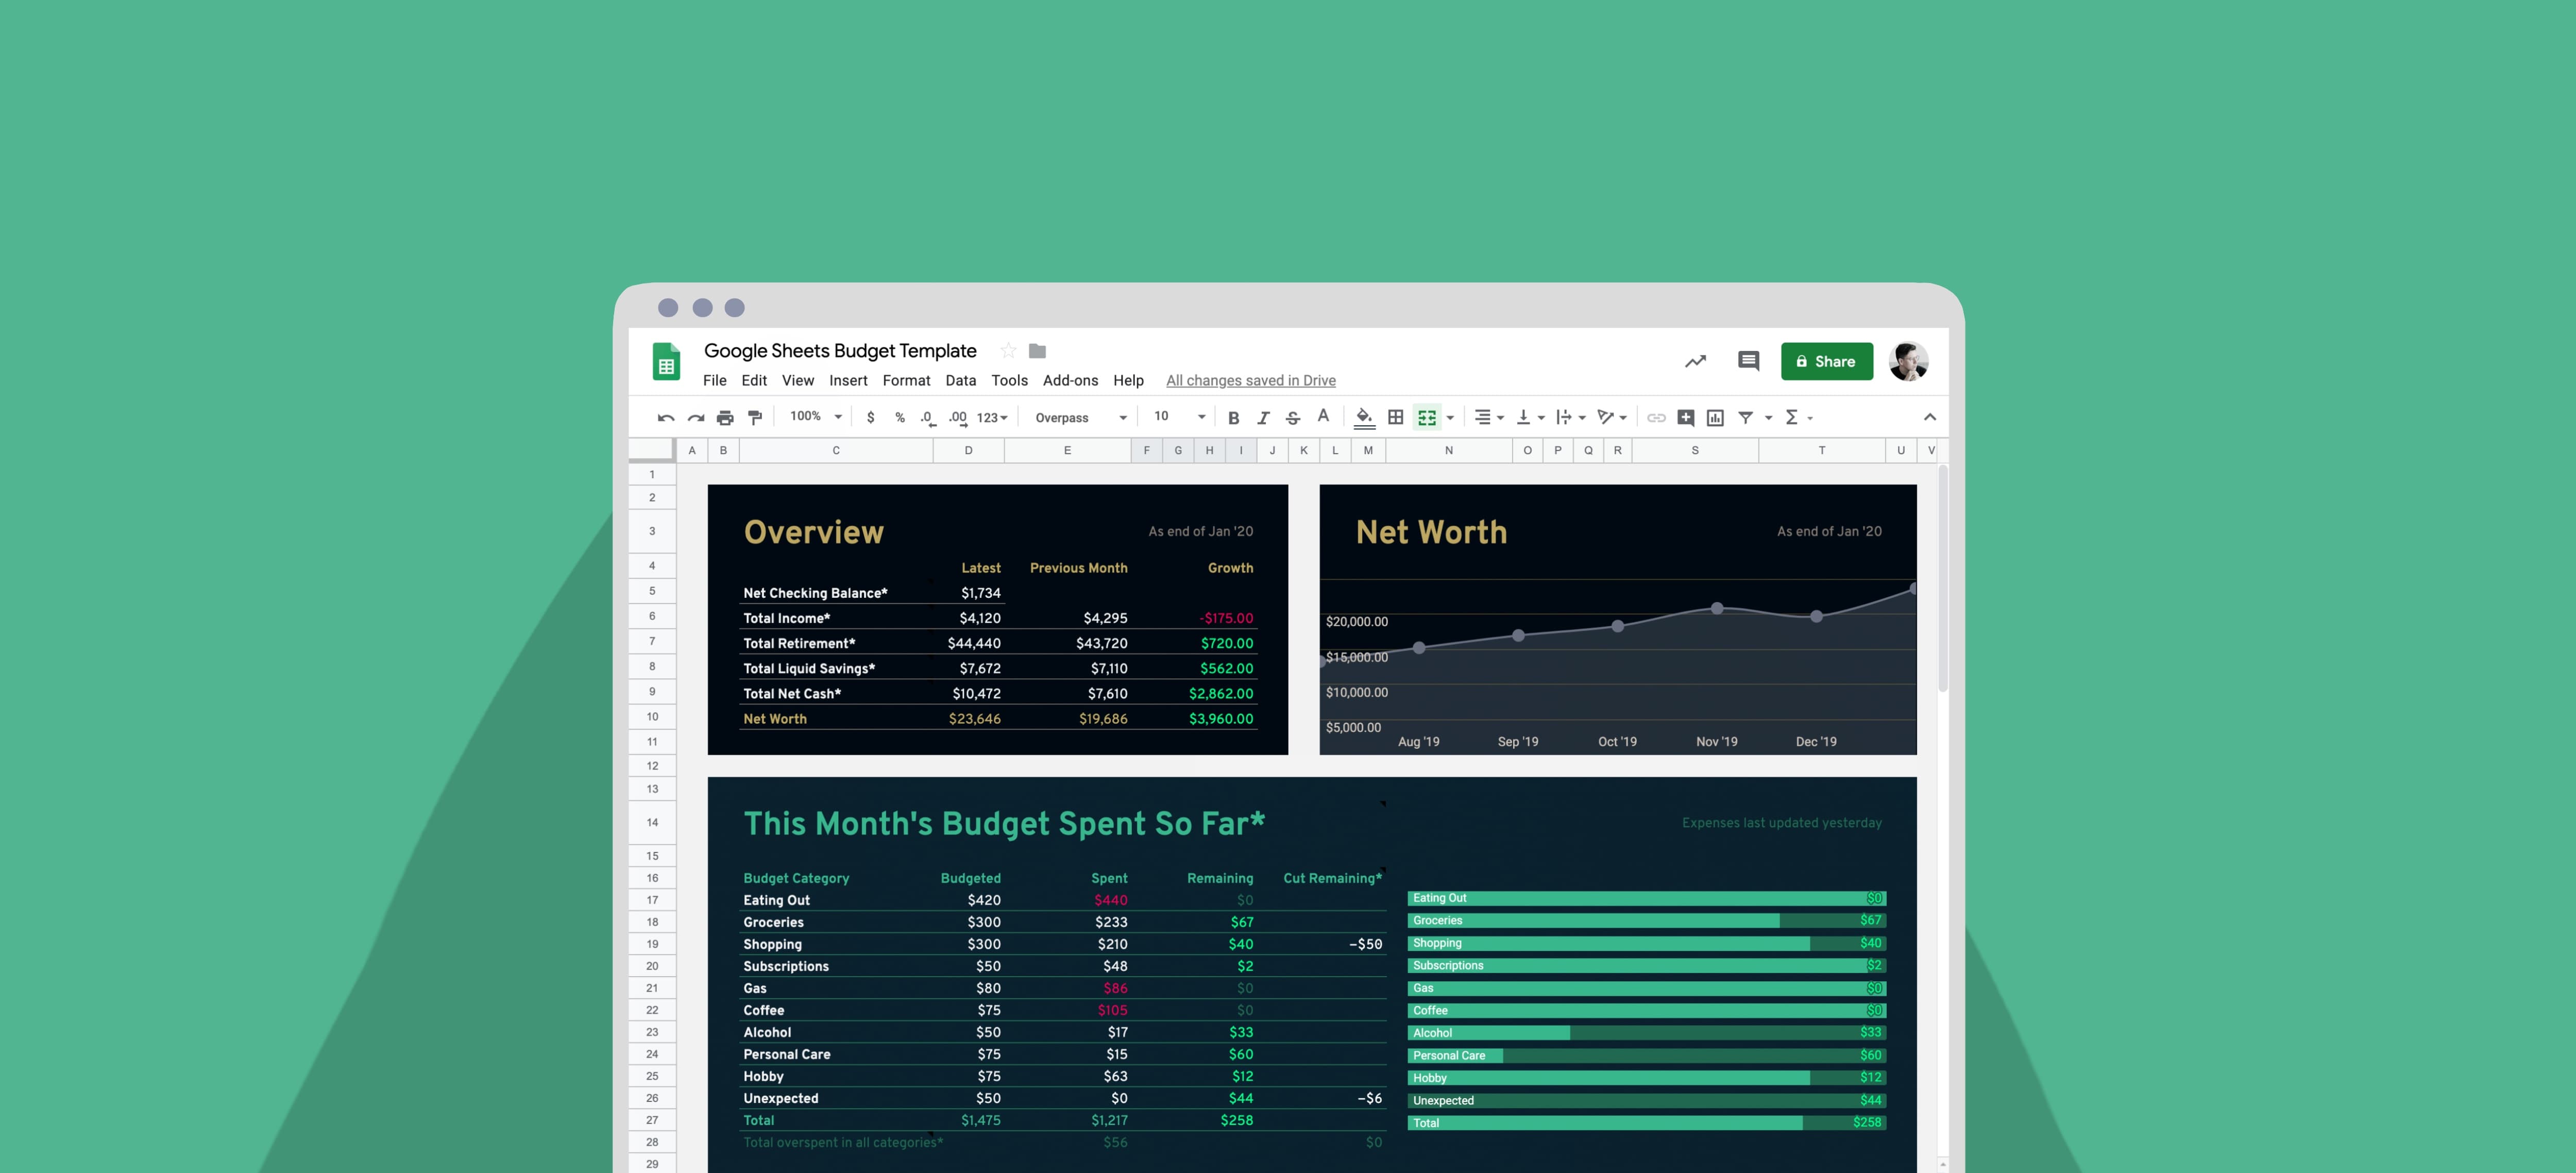
I have a strange love for spreadsheets and I want to share the budget template I made on Google Sheets that I’ve been using and building for over five years.
You can make your own copy by clicking the link below:
Make a copy: My Google Sheets Budget Template
The template is based off the principles and concepts from Ramit Sethi’s personal finance book, “I Will Teach You to Be Rich.” I’ll cover everything you need to know in this post, but if you want to learn more about it, you can read my summary of the book below.
What Makes This Google Sheets Budget Template Better Than The Others Out There
All the setup is on one page
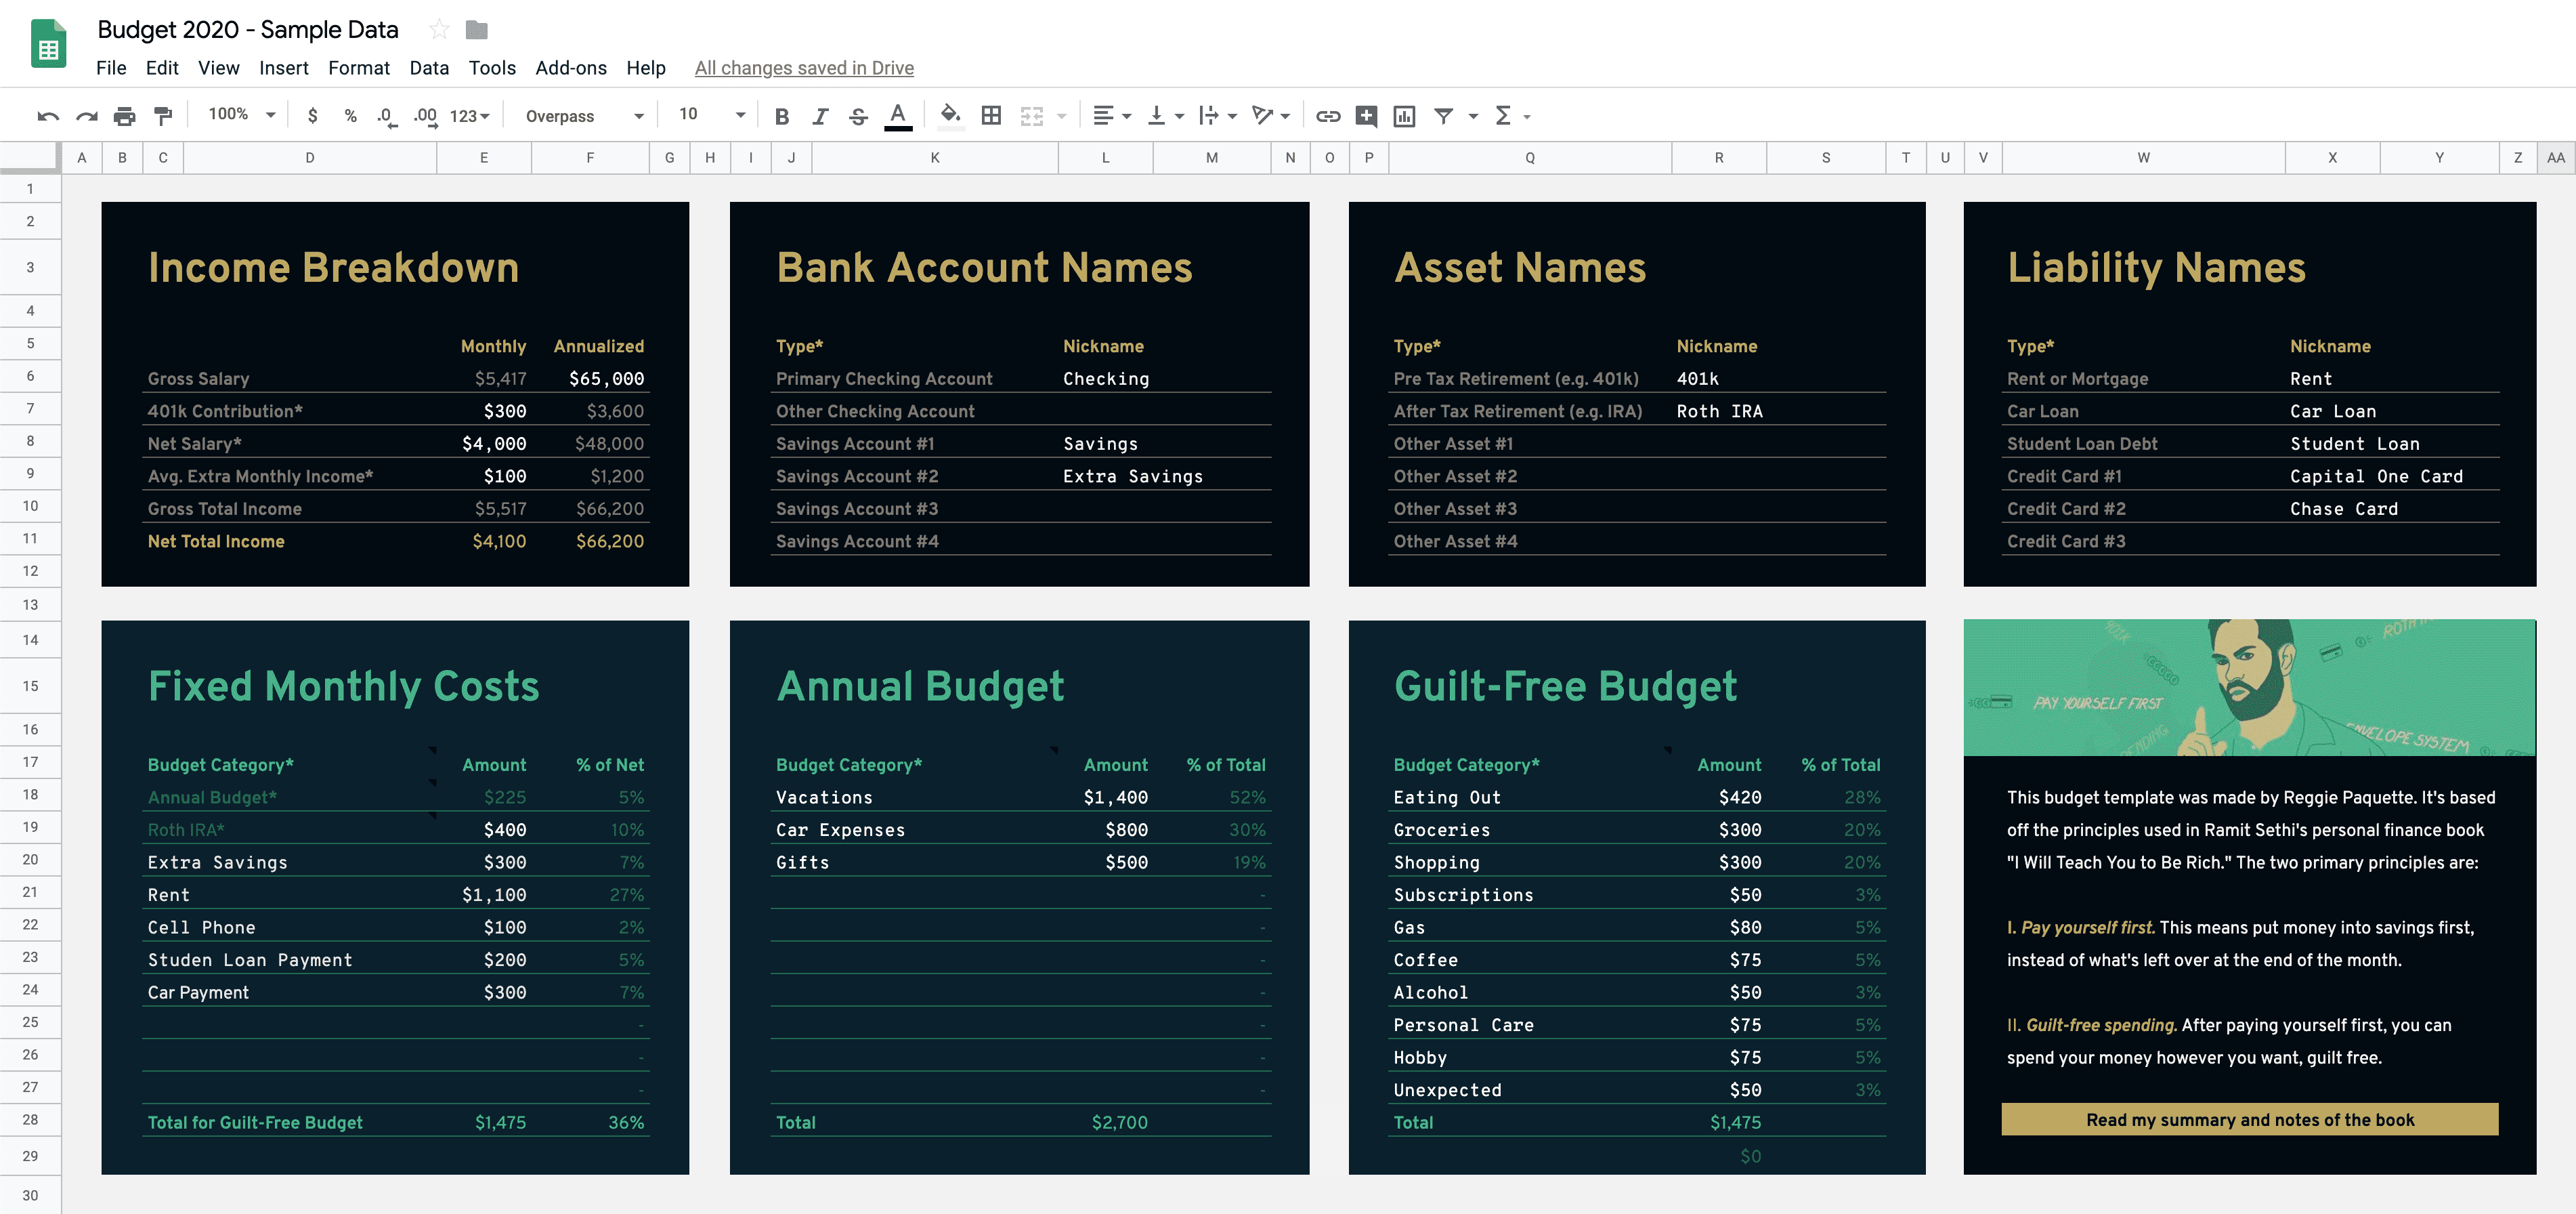
In just one configuration tab, you’ll fill out all your info: income, account names, budget, etc. All the other tabs pull data from this Config tab so you never have to enter in any information twice.
Built-in guided setup
Opening up a new Google Sheets budget template with all these numbers and tabs can be daunting.
That’s why I wanted to create a guided setup to make it super simple for anyone to get started. When you open up the template, you’ll be greeted with easy-to-follow prompts so you know exactly what you need to do next.
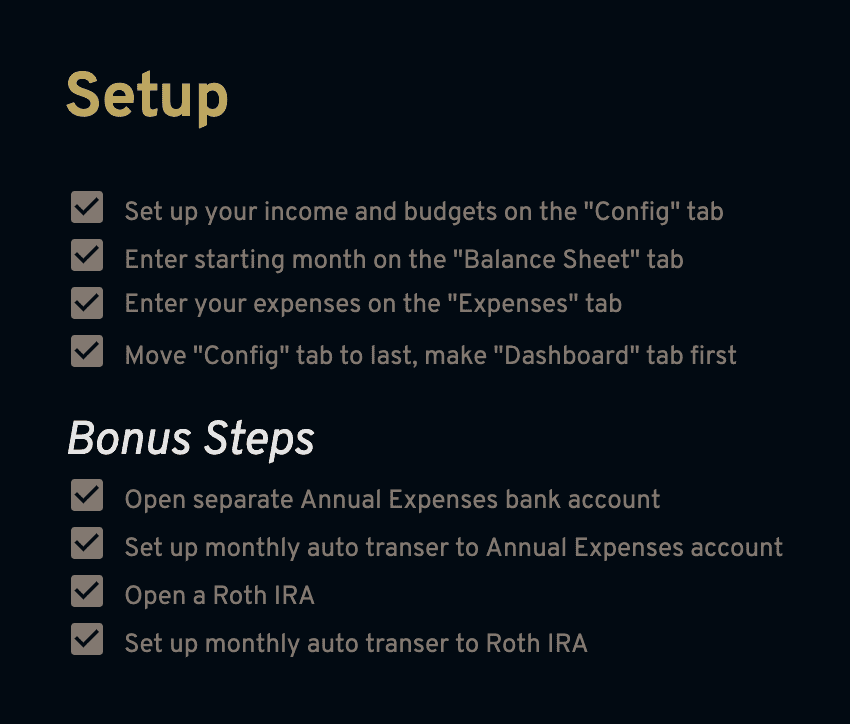
Setup checklist
After completing the configuration settings, the checklist shows you where to go next in the template to enter your expenses and account balances.
One dashboard to rule them all
My Google Sheets budget template has four tabs:
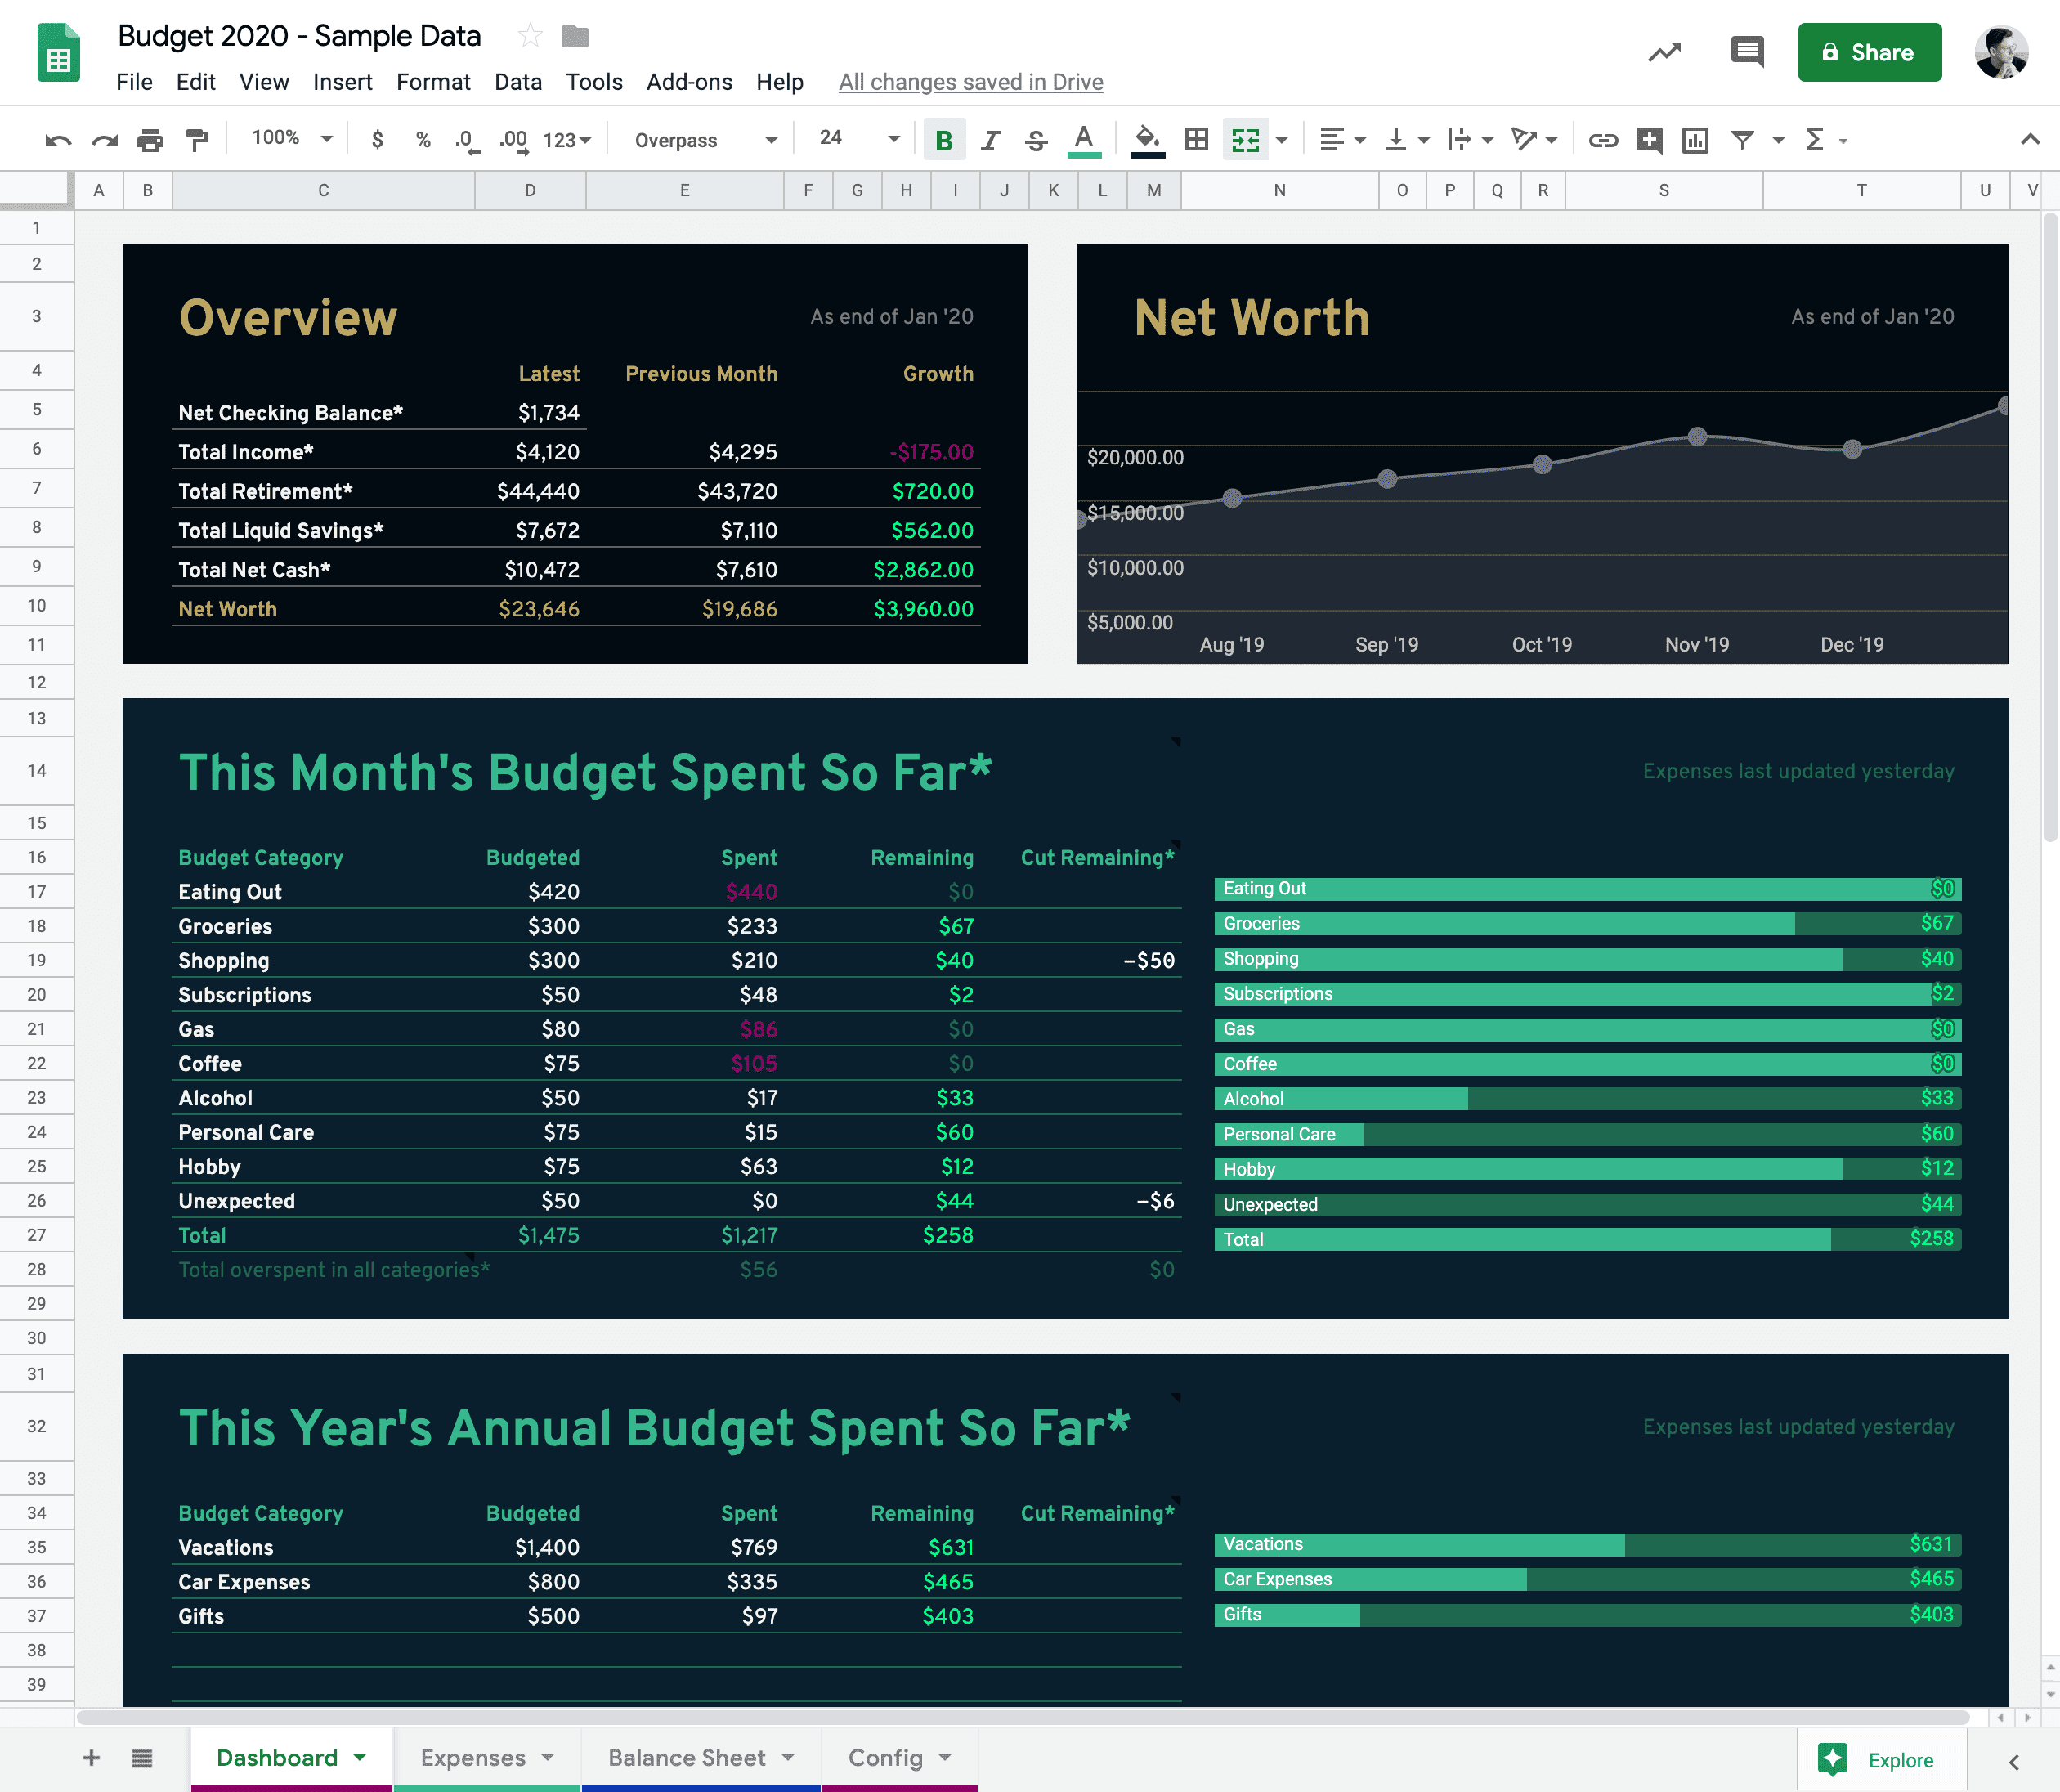
- Dashboard - the main tab where you can see your spending vs budget for the current month and analyze previous months’ spending. All the data is pulled from the other tabs.
- Expenses - where you enter all your expenses.
- Balance Sheet - to record your bank account, retirement account, credit card and loan balances, etc. This data is used to help measure whether your net worth is increasing or shrinking.
- Config - as explained above, this is where you fill out your income, name your accounts, and set your budgets, which is used in all the other tabs.
You’ll spend most of your time in the Dashboard:
Always know how much of your monthly budget you have left
As you fill out your expenses, there’s a “module” where you can see exactly how much of a budget category you’ve used so far in the current month and know exactly how much you have left.
If you’ve overspent in one budget category, the template will let you take remaining budget from another category to cover it.
Budget and keep track of annual, irregular expenses
The template is also built to accommodate irregular expenses that you might only spend money on or have to pay for a few times a year. Once you enter a list of the things you want to create an annual budget for, the template will calculate how much you need to save per month to cover it. And that amount is deducted before you set up your monthly budget.

Spend your money without feeling guilty
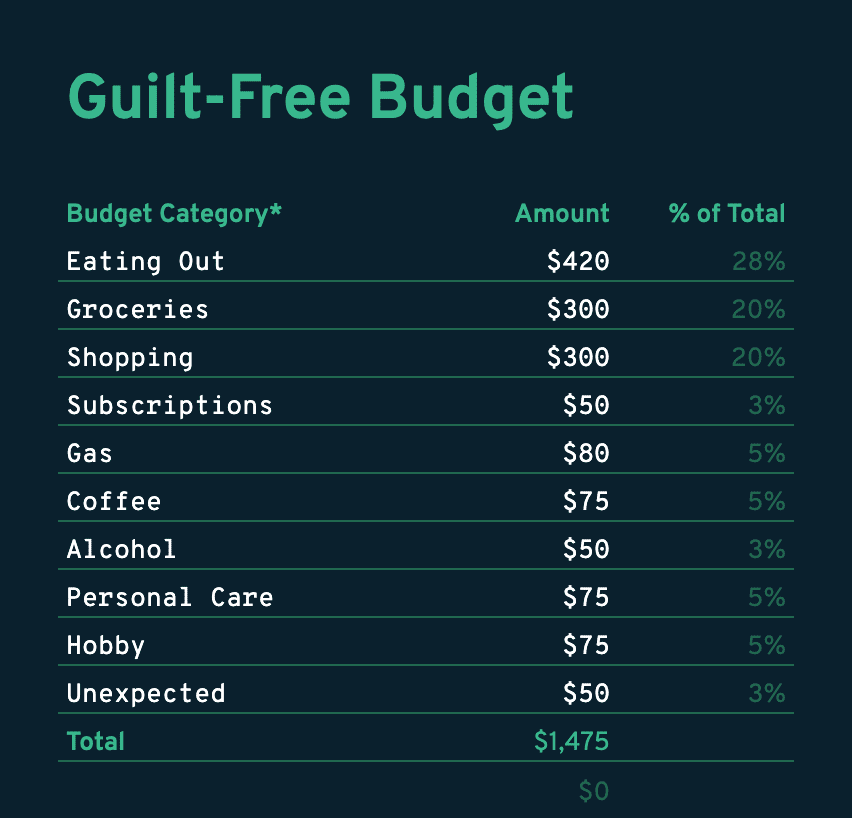
I call the monthly budget the “guilt-free budget,” which is a concept taken from the book “I Will Teach You to Be Rich.” Since the budget template is built to help you put aside money for savings before creating your monthly budget, it means you don’t ever have to feel guilty about spending the money you do have left over.
This has been a fundamental shift in my perspective about personal finance Ramit calls paying yourself first.
Built to drive behavioral change
Most of my friends use a budgeting app like Mint and I’ve tried them, too. But these apps don’t really help me spend less money - they just tell me where I spend my money and try to guess (poorly) the category.
And that’s why I love budgets built on spreadsheets. I can customize it exactly the way I need to actually help me spend my money more thoughtfully. On less of things I care little about, and more on the things I care a lot about.
A bad budget system only shows you where your money is going. A good budget system will create a change in your behavior.
If you want to try my Google Sheets budget template, make a copy of it and try it out.
There are simple and clear instructions with extra notes on cells that have an asterisk(*) - just hover over those cells to the see note.
If you’re stuck and need more info to get going, read on to get the details.
How to Use My Google Sheets Budget Template
Start on the Config tab.
Remember, cells with an asterisk(*) mean there is a note on that cell with more information. Hover over it to see what it says.
I. Enter your income
In the top left box on the Config tab, enter your income. Follow the orange colored cells as cues for which part to fill out next. If you don’t contribute to a 401k or typically receive any extra monthly income, enter $0.
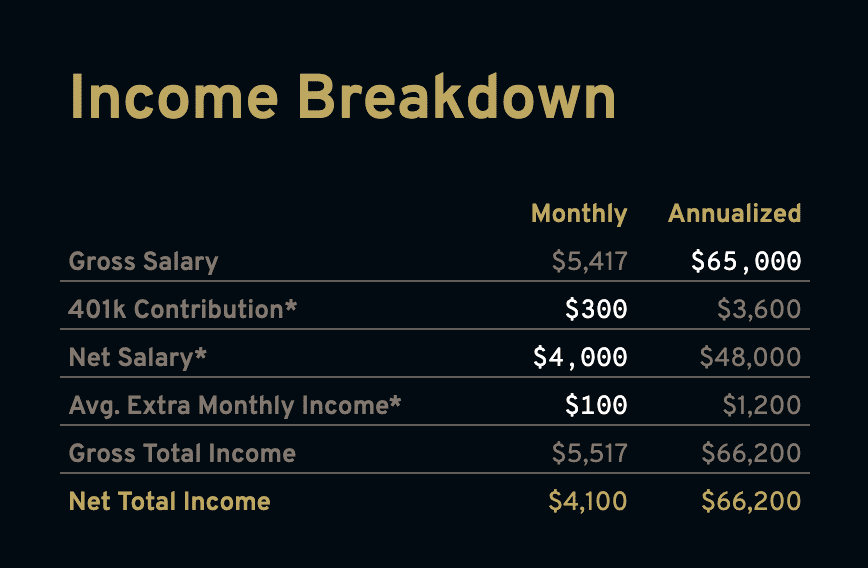
This budget template is only made for two sources of income. If you have more than one additional source of income, you can count them together and enter the total as one number for your extra monthly income.
All income entered here will be available for your budget. Before leaving the Config tab, you’ll be able to choose how much of it will go into savings, additional retirement accounts, loans, etc, but first you have to name your accounts.
II. Name your accounts
You’ll need to give a nickname for every type of bank account, asset, and liability you have. The type is very important to formulas in in the Dashboard and Balance Sheet tabs and cannot be changed. If you don’t have an account with the listed type, leave it blank and skip it.
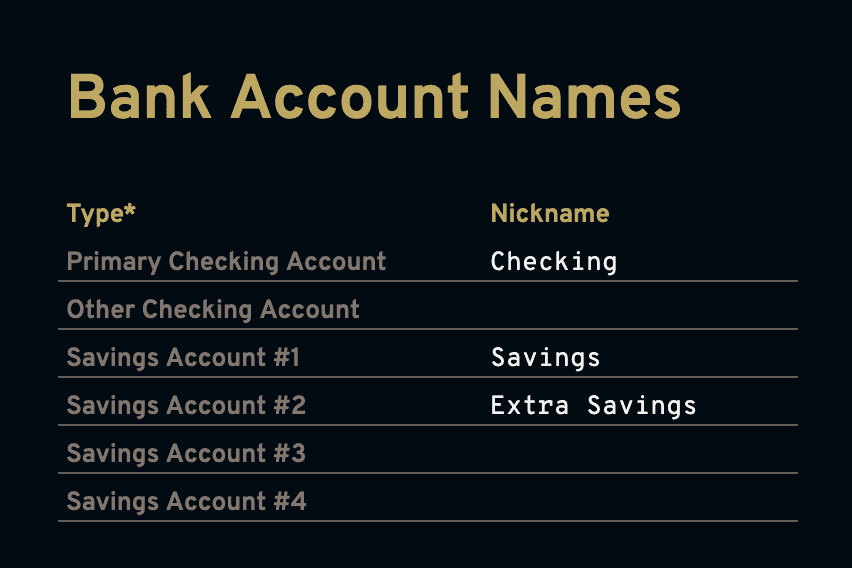
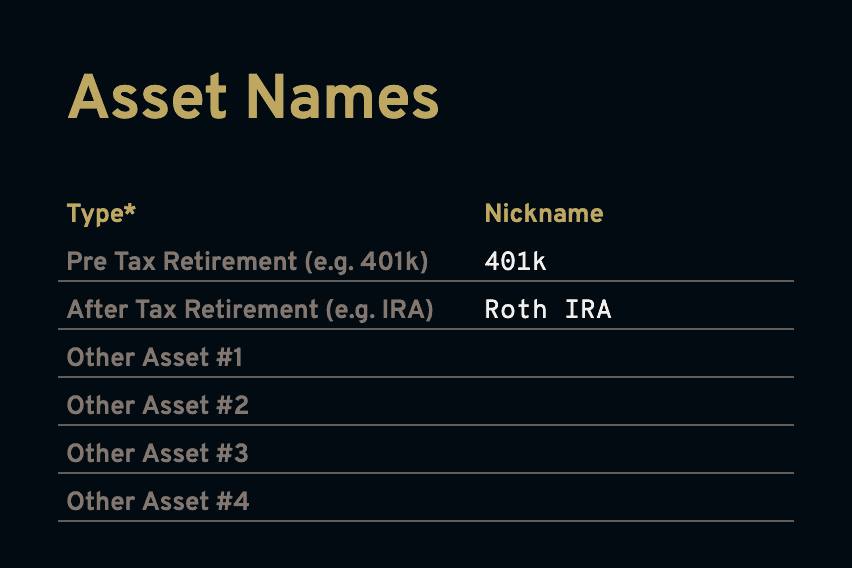
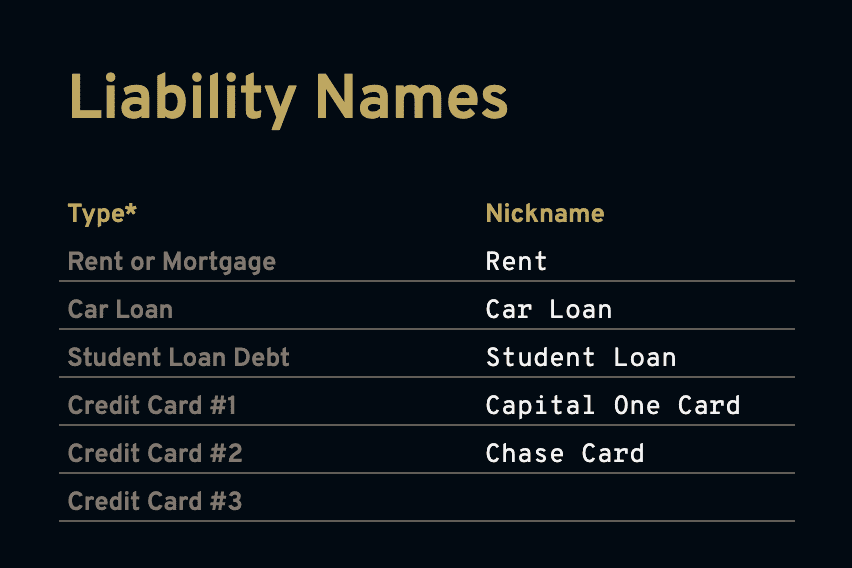
If you have more accounts than what the types have you can count them together as one. For example, if you have four credit cards, you can count two of them together and give credit card #3 the nickname Amex & Citi cards.
III. Create your annual budget
The reason why you create your budget for annual expenses before monthly expenses is so that you’re encouraged to set aside money to be better prepared for irregular expenses.
Start by adding things you pay for once a year or irregularly in the Annual Budget box. You can find examples and suggestions by hovering over the budget category* cell.
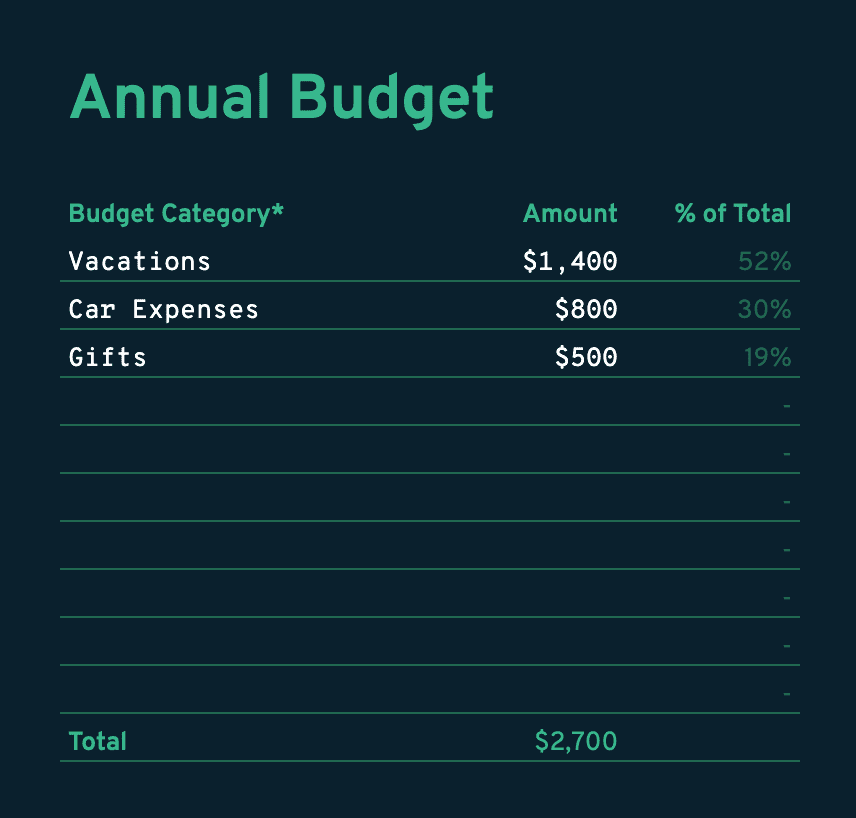
After you enter in all the annual and irregular expenses you can think of, the budget template will divide the total into a monthly amount inside the Fixed Monthly Costs box.
IV. Enter your fixed monthly costs
Fixed Monthly Costs are recurring monthly expenses that you don’t expect to change month-to-month.
At the top of the list is the monthly amount to set aside for your annual budget and the second item is your after tax retirement account. If you have one and gave it a nickname in the Asset Names box, the nickname will be used for this line item.
If you don’t have one or don’t plan on contributing to the one you do have, enter $0 for it.
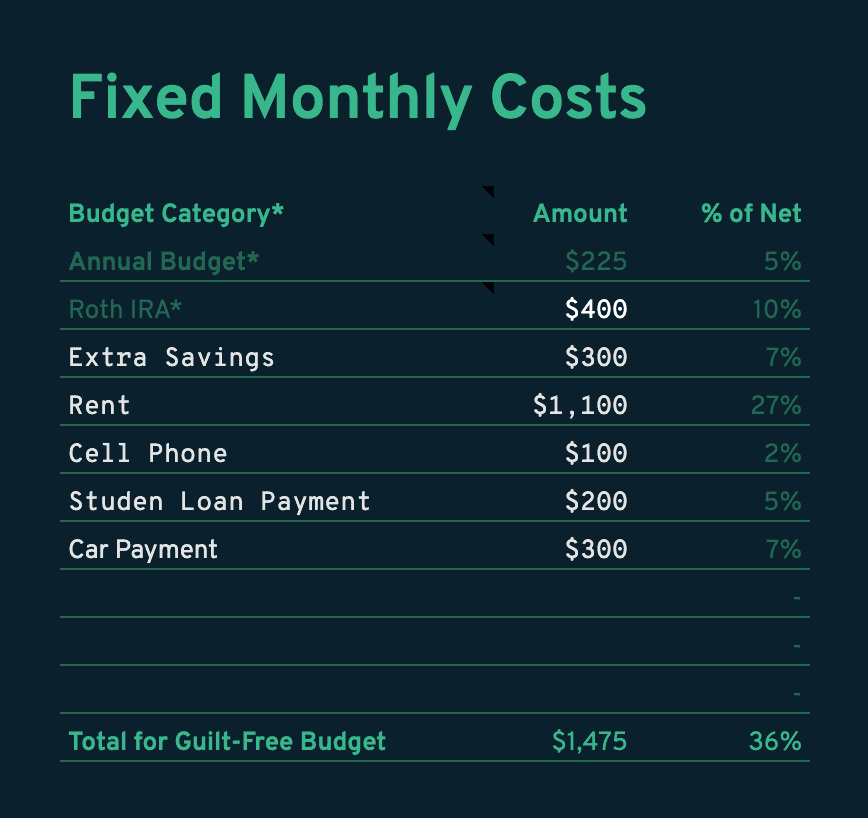
There is room for eight additional fixed monthly costs. There are suggestions in the note on the budget category* cell. Along with budgeting for annual expenses and retirement, I highly recommend setting more money aside for extra savings.
This is the pay yourself first concept described in “I Will Teach You to Be Rich.”
“The goal [of pay yourself first] is to make sure that enough income is first saved or invested before monthly expenses or discretionary purchases are made.”
Now you’re left with your total for guilt-free budget, which is how much you have left for discretionary spending.
IV. Create your guilt-free, monthly budget
As explained earlier, it’s called your guilt-free budget because this is what is left over after setting money aside for savings, retiremenet, and future annual expenses. This is your money to spend however you want.
In the Guilt-Free Budget box, enter categories of expenses and an allotted amount. Again, there are suggestions in the note on the budget category* cell.

If you’ve budgeted over what you have available in your total for guilt-free budget from the Fixed Monthly Costs box, this total number will turn red and. The number below the total number is how much you have left from your guilt-free budget
Your monthly and annual budget is now set up! The next step is setting up the Balance Sheet.
V. Setting up the balance sheet
Before going deep into the Balance Sheet, you just need to enter your start date in the orange cell.
The start date is the first of a month, current or in the past, written as “1/1/2020”. Once you enter your start date, it will reformat to “Jan ‘20” and fill the rest of the range for you.
There’s more to do here, but it makes sense to first record your expenses.
V. How to record expenses
In the Expenses tab you’ll record your monthly and annual expenses - one row per one expense.
One of the biggest presumable downsides of doing your budget in Google Sheets is you have to enter in your expenses manually, but this is a blessing in disguise. Entering your expenses manually has a big and positive psychological effect on your spending behavior. It makes you “feel the pain” of every dollar you spend.
Manually recording your expenses every week will force you to review every transaction, to feel the pain of every dollar spent, and make you think “was that really necessary?”
Another benefit is you can easily split an expense into two different budget categories, which I’ve found helpful many times.
Across the heading, you’ll see your guilt-free budget and annual budget categories from the Config tab. When you enter an expense, start with the date in column a, the name of the place you spend the money in column b, and then tab over to the column with the right budget category for that expense.
Go ahead and enter all your expenses beginning from the start date you entered on the Balance Sheet. Don’t enter expenses or transfers you already accounted for in the Fixed Monthly Costs box on the Config tab.
VI. Filling out the balance sheet
Once at the beginning of every month you’ll fill out the Balance Sheet tab for the previous month. This is where you will add up all the money you have and owe in your accounts so you can see if your wealth and net worth are increasing or shrinking.
Before moving on, make sure the first three items are marked complete in the Setup checklist on the Config tab.
In the Balance Sheet’s sidebar, you’ll see the accounts you’ve named on the Config tab. At the beginning of the month when you fill this out, you’ll enter the balances of each account in the previous month’s column. For example, if I was filling this out today on February 7th, I’d enter the balances under the Jan ‘20 column. So if you’re starting date is the first of this month, you don’t have to fill out anything until the month is over.
You only need to enter balances in the white rows. You can skip the greyed out columns (don’t delete them) and don’t overwrite anything with a - in the cell. The dashes indicate a placeholder for a formula and will populate if and when it makes sense.
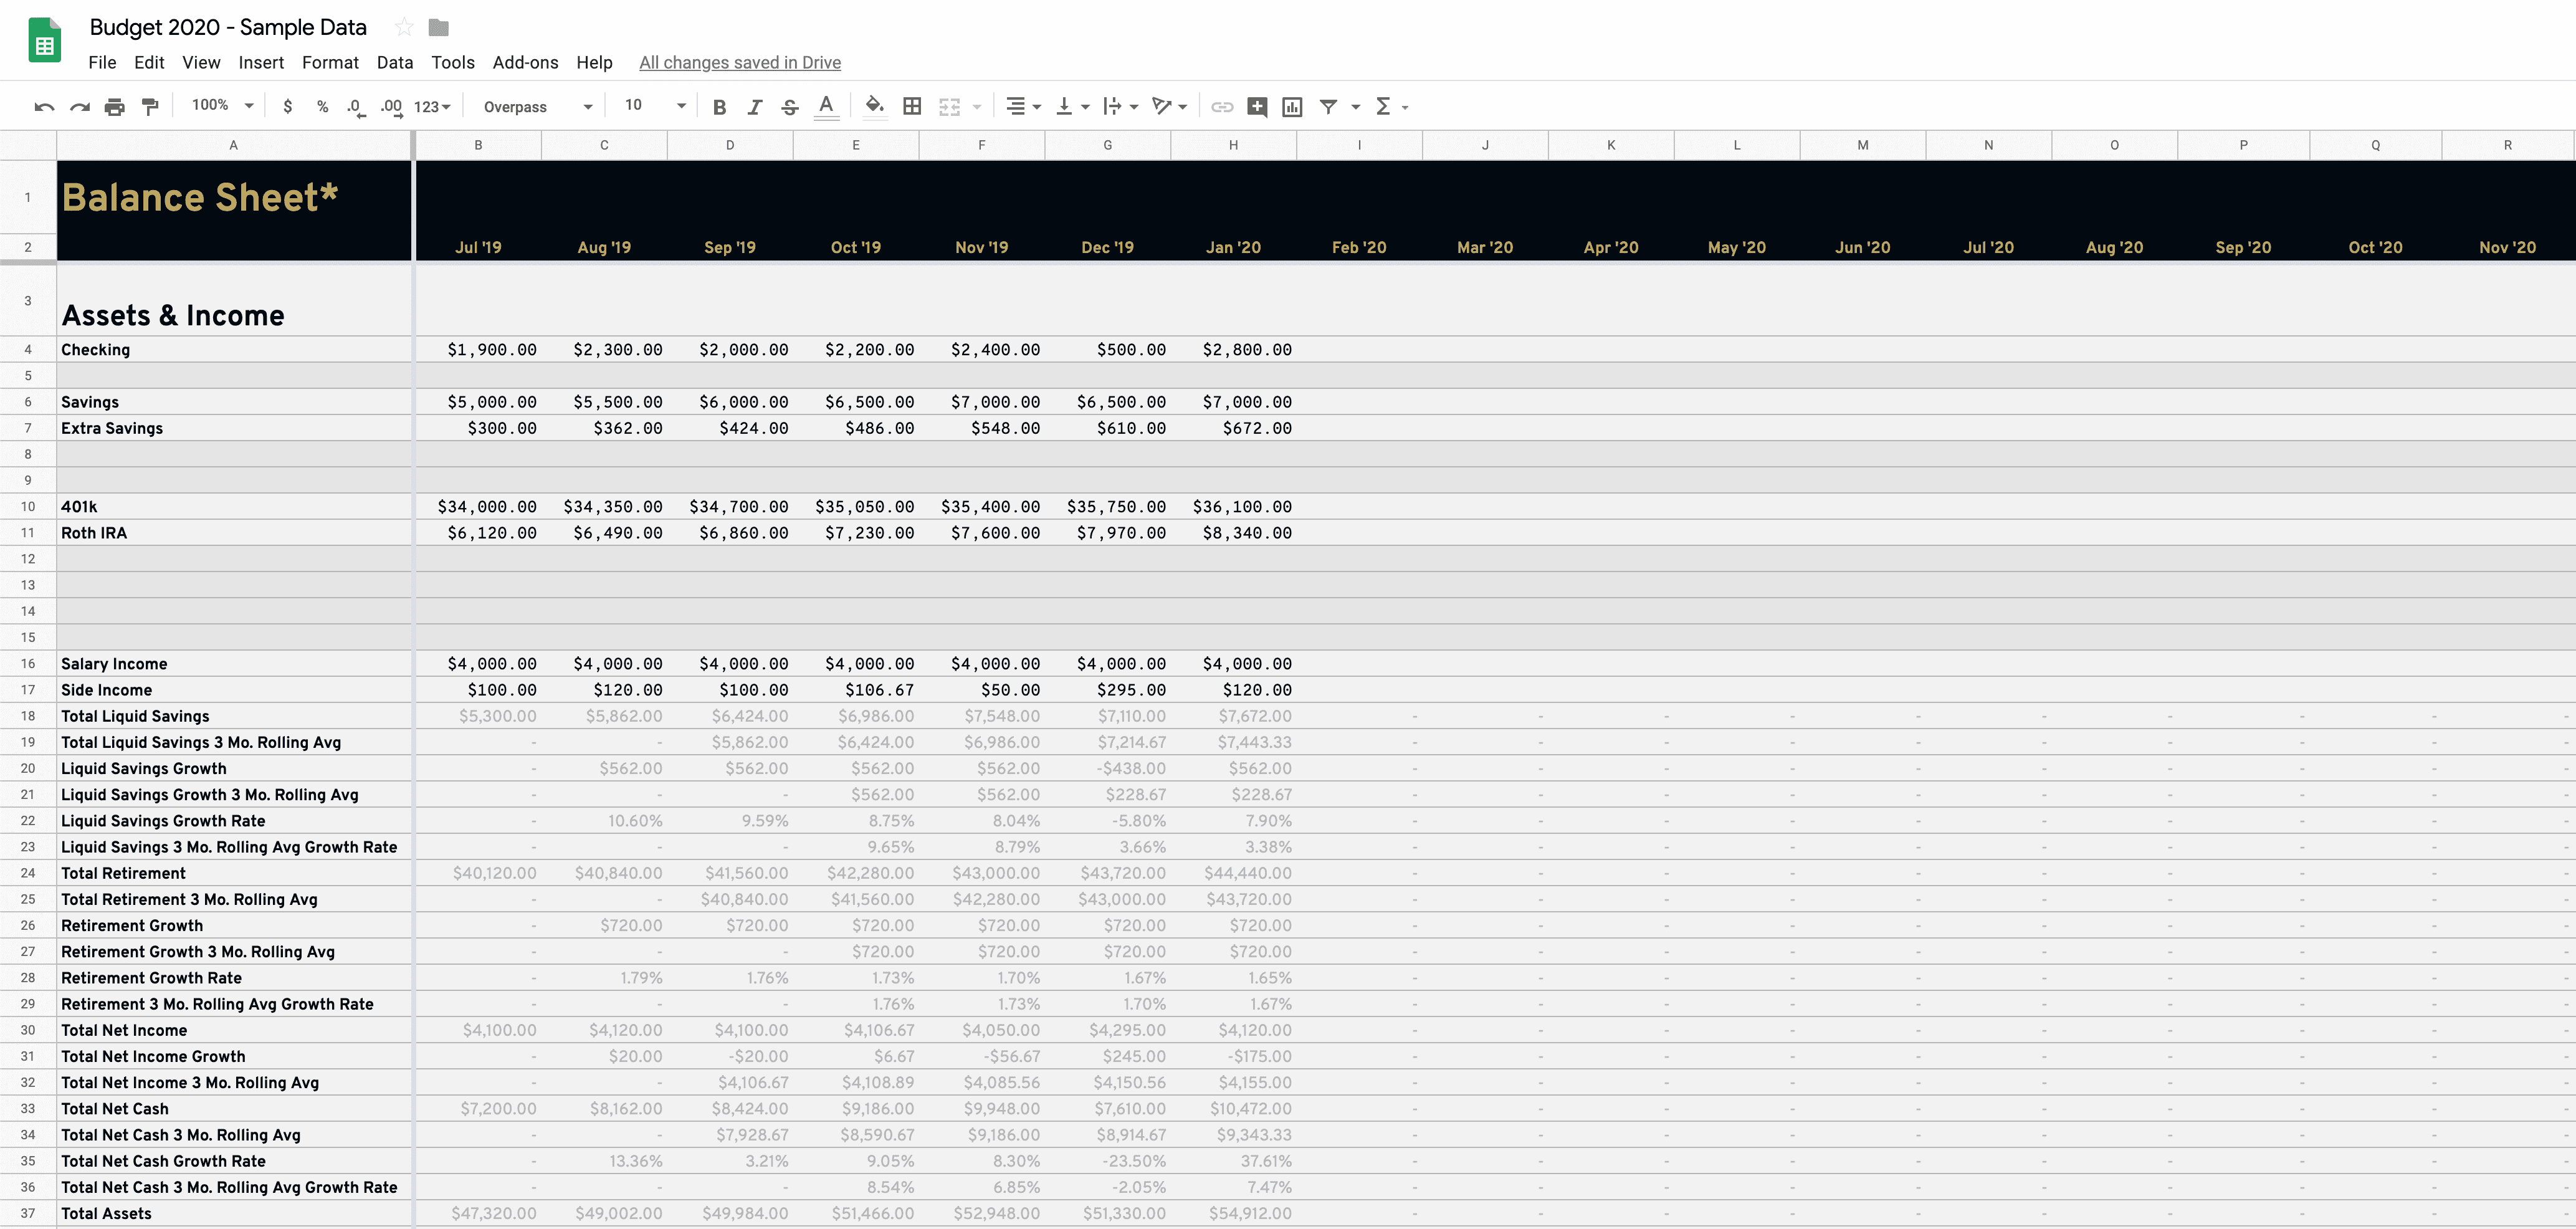
In the Liabilities section, you’ll do the same thing as you do with your bank accounts but for your rent/mortgage, loans, and credit cards. If you don’t have a mortgage, enter $0 for the rent. Rent is paid on the 1st of the month so by the end of the month, which these totals are representing, you don’t owe anymore rent. So actually, rent should be $0 for every month in the Balance Sheet.
If you pay a mortgage, then you can enter the mortgage payoff amount in the mortgage row. I do the same with my car loan. When filling out your credit card balances, make sure any pending credit card payments are already reflected in your bank account balance.

The Monthly Expenses and Annual Expenses sections automatically sum your expenses for that month for each budget category. You can analyze this easier in the the Dashboard tab.
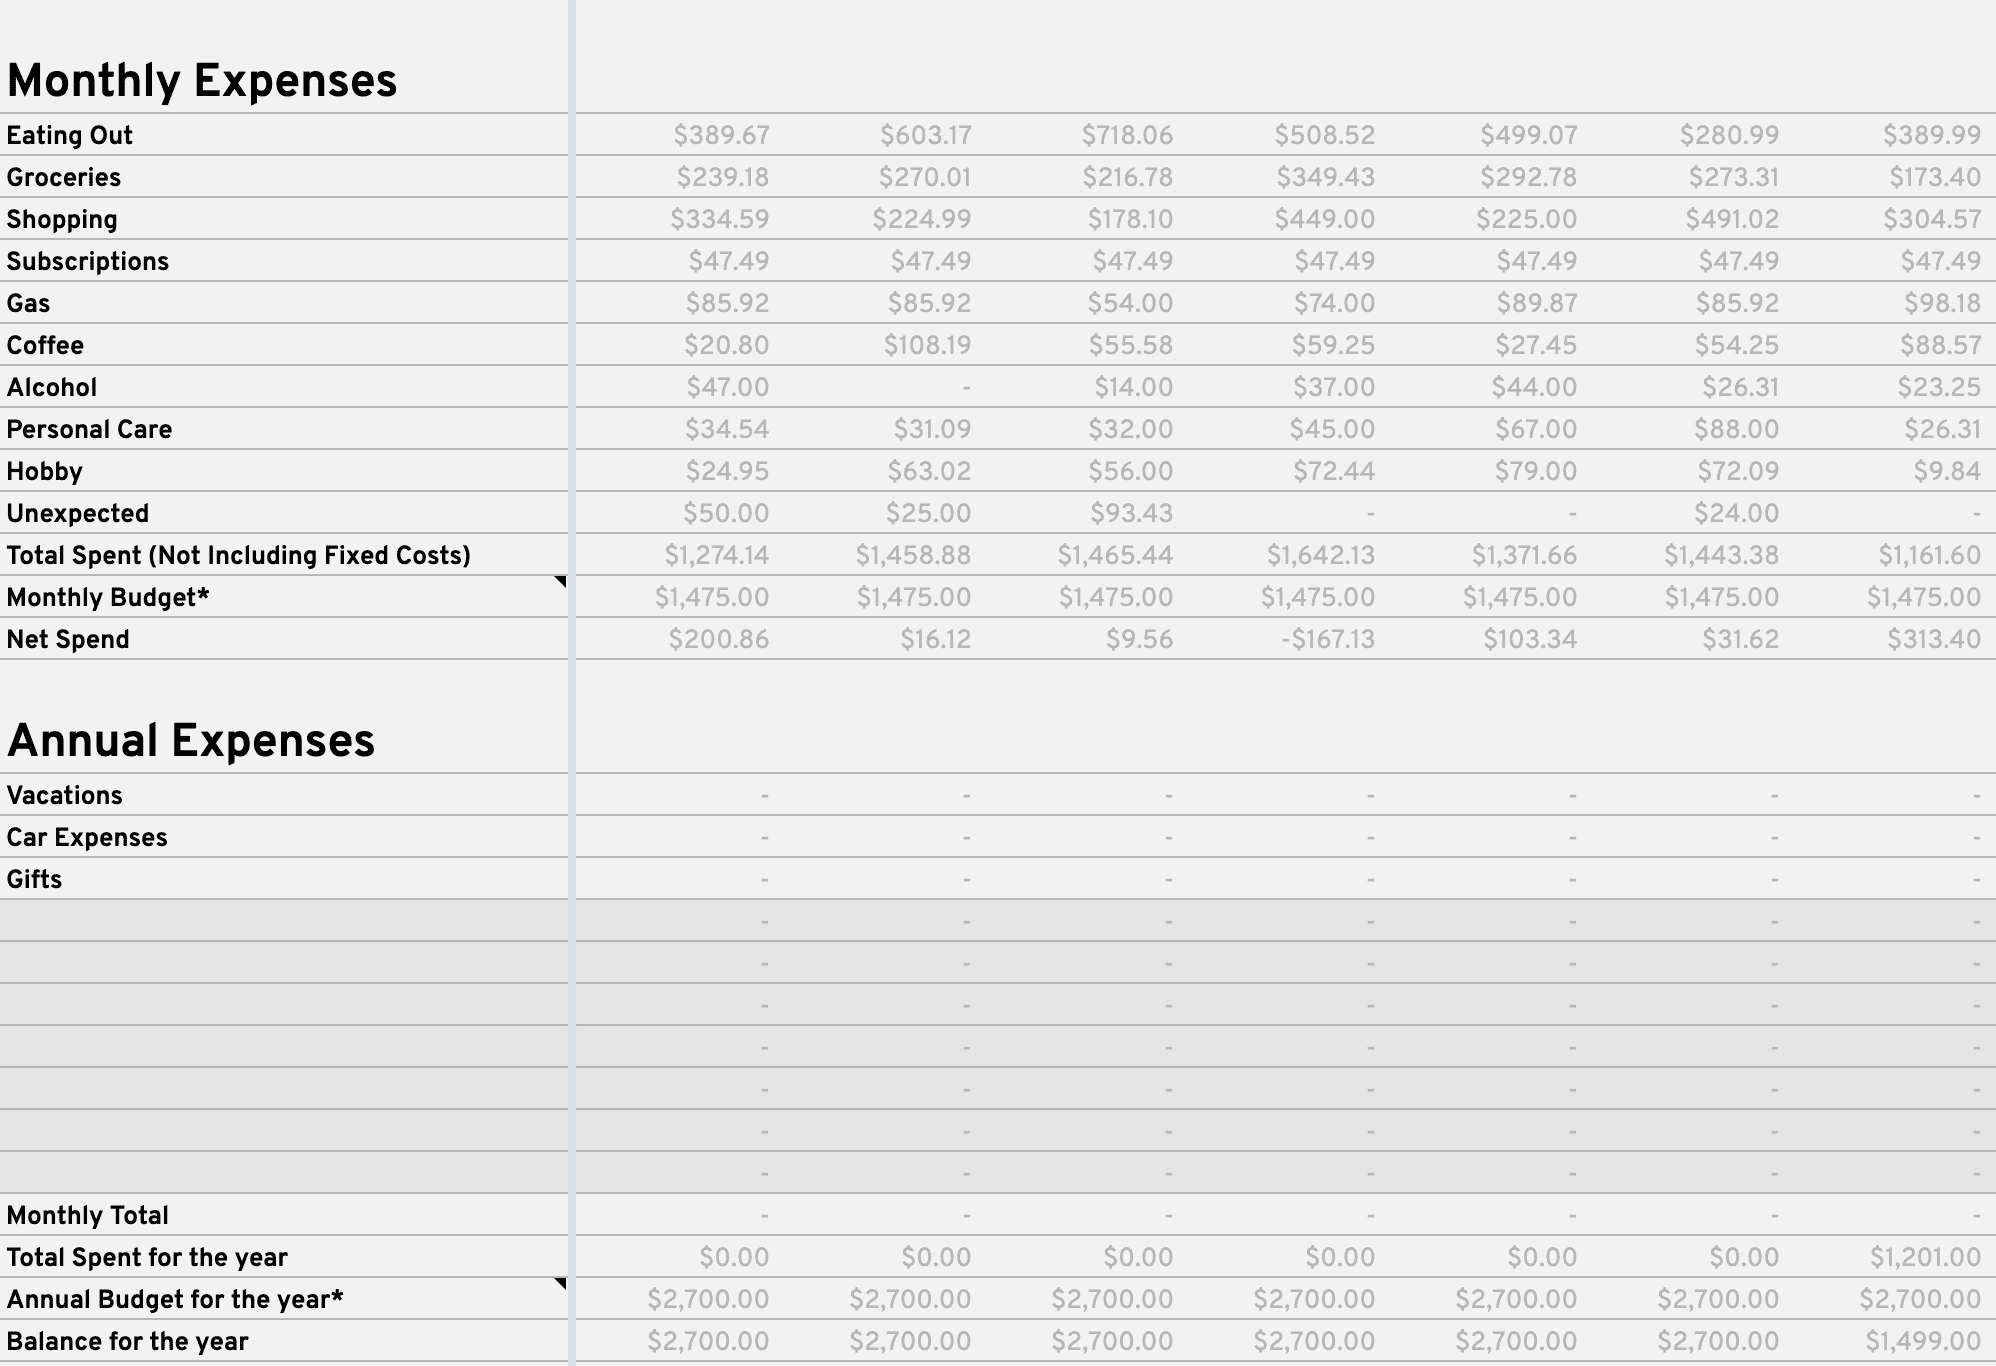
The last section is the Totals section, which brings everything together to calculate your net checking balance (money in checking minus current credit card balances) and your net worth.
In the last row you can leave notes for yourself if something noteworthy occurred that you might want to come back to. The word “Notes” will auto populate in each month, but to leave an actual note, right-click the Notes cell and select “Insert note.”

And that’s all you need to do on the Balance Sheet tab. As you use this Google Sheets budget template each month, more data on the Dashboard tab will start to populate and be more useful.
VII. Using the dashboard
On to the best part - the Dashboard. This is where you can see the most useful insights for your budget. Except for a small part that I’ll explain below, everything on the Dashboard is automated and you shouldn’t have to change anything.
At the top is an Overview box with just a few pieces of information to get your overall personal finance health. It’s updated every time a month is filled out on the Balance Sheet so if your start date is the first of the current month, you won’t see anything here yet.
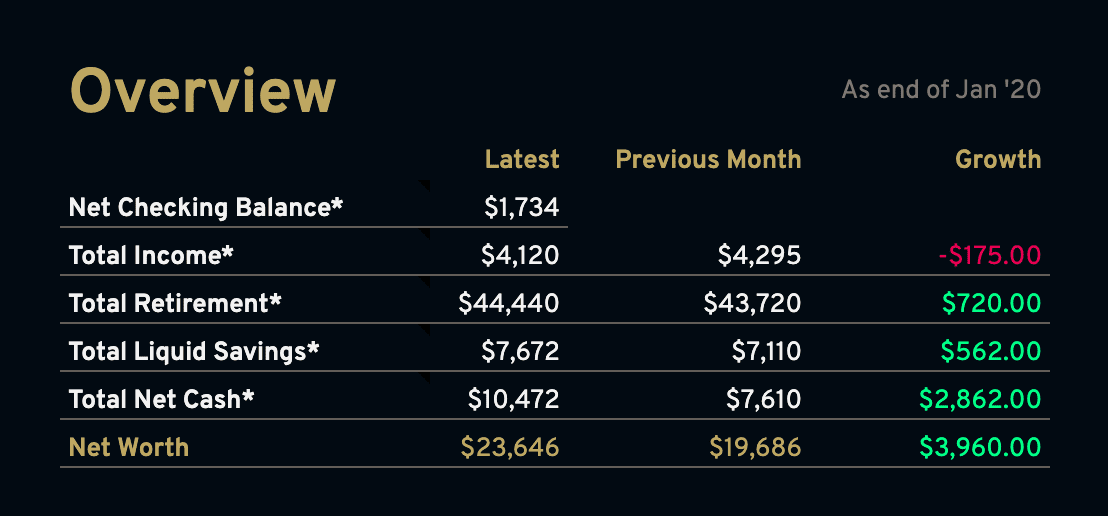
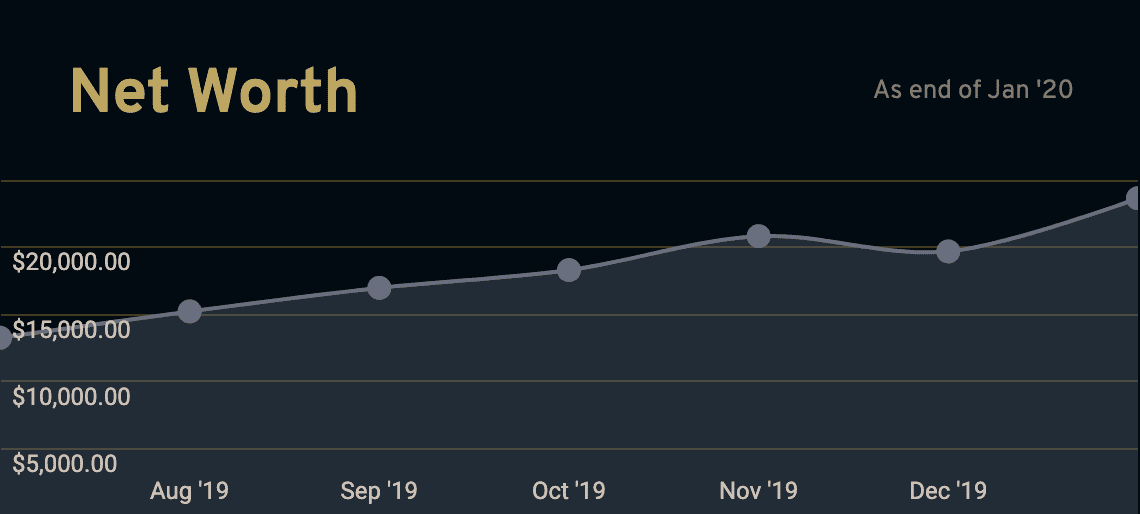
To the right of your Overview box is a graph of your Net Worth growth. This is pulling the last seven months of data from the Balance Sheet.
Next is my favorite part of the Dashboard, the This Month’s Budget Spent So Far* box. This shows how your spending is doing for the current month compared to your budget for each category. Since I update my Expenses tab every morning, I can see my updated budget here every day so I know exactly how much of my budget I have left for each category.
If you overspent in one category, you can subtract Remaining budget from another budget category by subtracting an amount from it in the Cut Remaining* column.
There is also the same module for annual expenses below the monthly one.

Both the monthly and the annual Budget Spent So Far boxes will update automatically every month and year respectively.
Next is the Spent vs Budget Previous 7 Months* box. This is a dynamic graph that compares your spending to your budget for each category. Use the dropdown selector in the top right of the box to look at a specific budget category or look at the total.
Again, this graph is only looking at the previous seven completed months. It doesn’t take into account the current months’s spending because it’s not over yet.
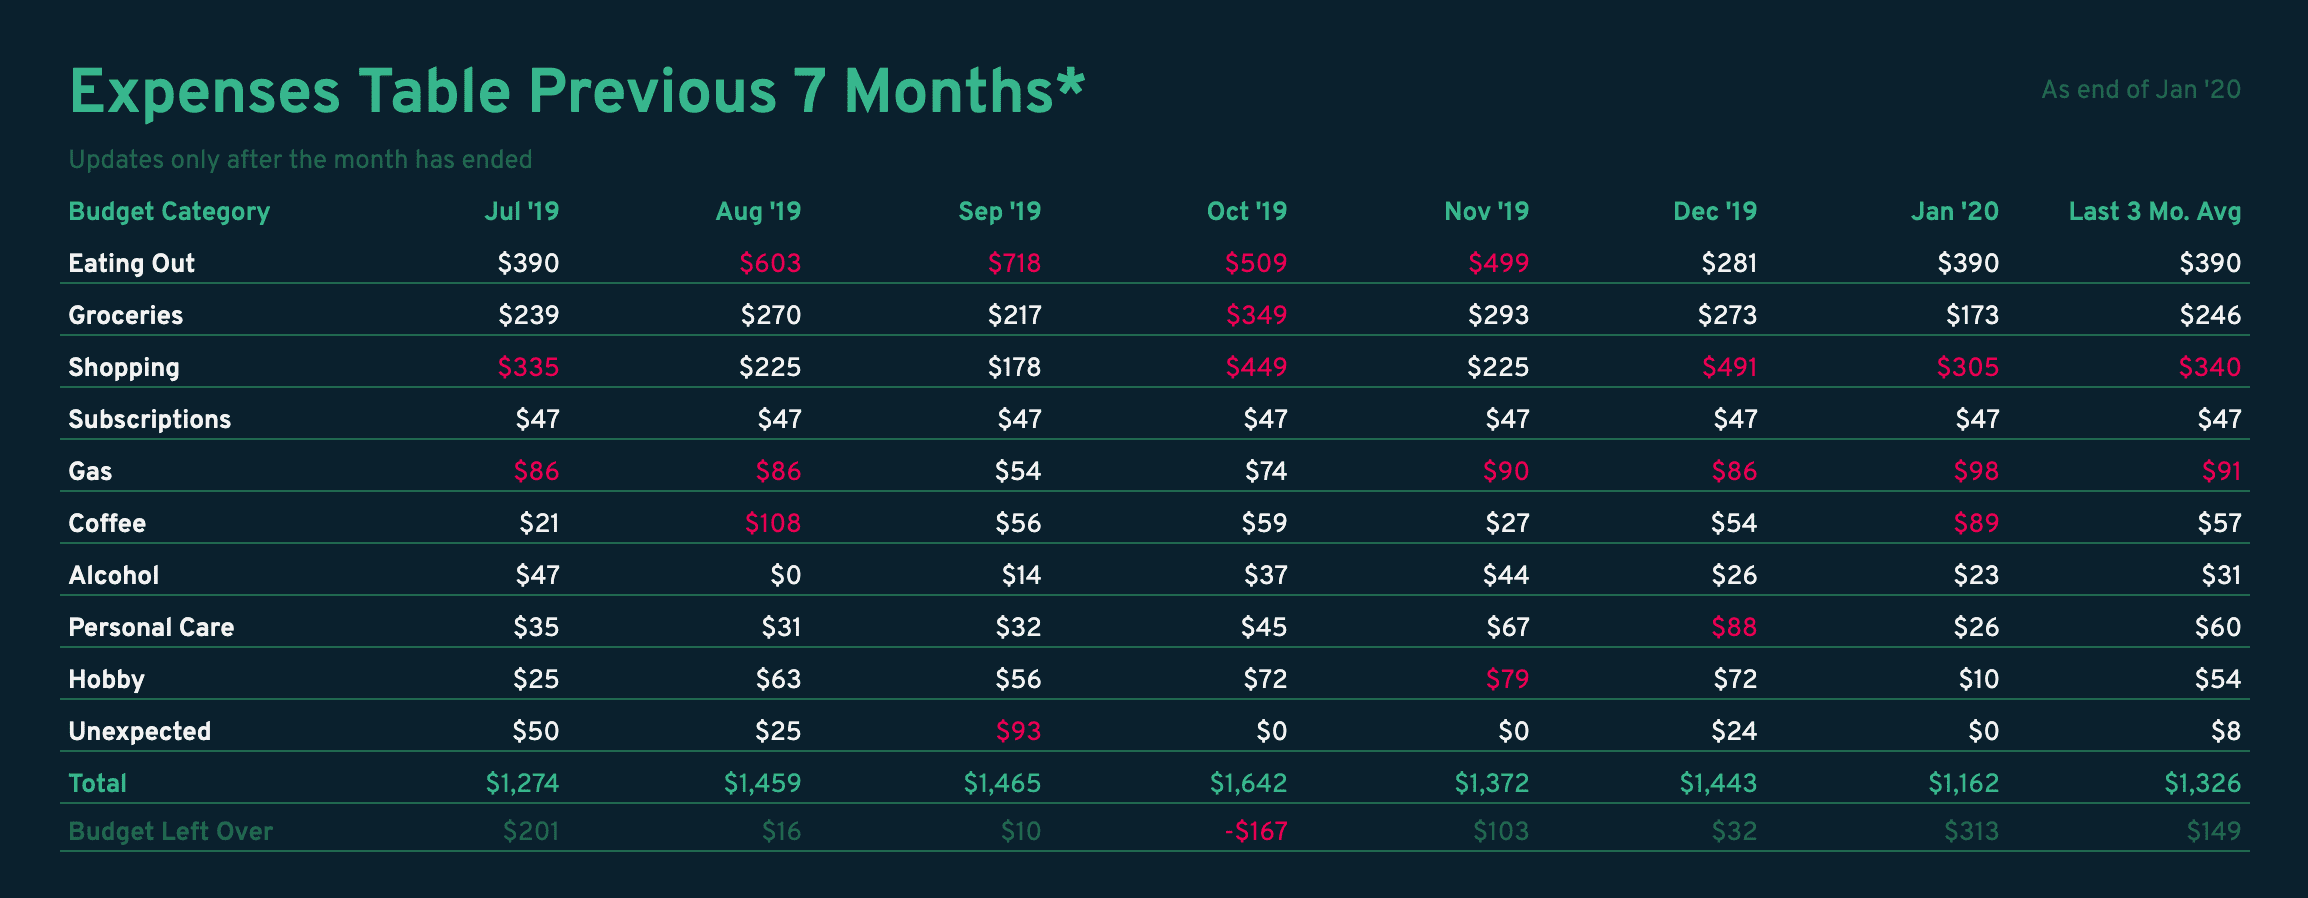
Last on the Dashboard tab is the Expenses Table Previous 7 Months* box. This provides the same data as the graph above, but in a table format. Amounts will turn red if you overspent your budget in that category that month. This is a great way to quickly see how you’re doing staying under budget at a glance.
Bonus Budgeting Tips
A budget is only good if you update it consistently, keep it accurate, and spend time analyzing your spending. That’s why I made it a point to make this budget template in Google Sheets look nice, be easy to use, and be rewarding to use.
But sometimes that’s still not enough. There’s definitely been times where I don’t do it for a few weeks at a time and the more you wait, the more work you’ll have to do, and the more you won’t look forward to doing it. I‘ve made it a habit to enter my expenses every morning instead of once a week or month.
If you believe a budget will help you get control of your spending, read this guide on how to stick to new habits:
Another tip is to use a credit card for all transactions when possible. Using a credit card makes it much easier to keep track of your spending and at the same time protects your bank account from fraud, builds your credit, and you can earn points and rewards.
Let me know what you think of the spreadsheet. If you found some places where I messed up or have ideas for new functionality, let me know on Twitter.
You might also enjoy
-

Options Trading 101: Options Explained in Plain English
An introduction to stock options trading for beginners.
-

I Will Teach You to Be Rich—Summary, Notes, + Quotes
The best introduction to personal finance and how to enjoy spending your money.
Never Miss an Article
Get notified by email when I publish a new article.
